1. 为什么要封装 HTML?
在写博客时,很多时候我们会遇到这样的场景:
默认的 Markdown 格式无法满足排版或功能需求,比如想插入一个自定义样式的提示框、好看的标签或者一键复制的按钮。如果直接在文章里写 HTML,内容会变得很混乱,而且后续维护和复用都很不方便。
Hugo 提供的 Shortcodes 功能,刚好就是为这种“写一次、处处复用”的场景准备的。
这一篇就以“复制按钮”为例,演示如何在 hugo-theme-stack 项目里封装一个可复用的 HTML 组件。
2. Shortcodes 基础:放在哪、怎么命名?
Hugo 规则:所有自定义 Shortcodes 都放在 layouts/shortcodes/ 目录下。
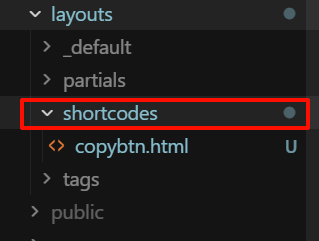
比如我想做一个点击按钮就能复制指定文字的组件,就可以这样操作:
- 新建文件:
layouts/shortcodes/copybtn.html - 之后在任意文章里,都可以通过以下格式调用组件:
1
| {{< copybtn value="待复制文字" >}}
|
命名规则:
- 文件名
copybtn.html → 调用名就是 copybtn - 名称内不能带
- 以外的奇怪字符,建议全小写、用中划线或下划线分隔
3. 实战:封装一个“复制按钮”组件
3.1. 新建 Shortcode 文件
在项目根目录下新建(如果目录不存在就自己创建):
1
| layouts/shortcodes/copybtn.html
|
填入下面这段代码:
 1
 2
 3
 4
 5
 6
 7
 8
 9
10
11
12
13
14
15
16
17
18
19
20
21
22
23
24
25
26
27
28
29
30
31
32
33
34
35
36
37
38
39
40
41
42
43
44
45
46
47
48
49
50
51
52
53
54
55
56
57
58
59
60
61
62
63
64
65
66
67
68
| <button
type="button"
class="copy-btn-shortcode"
data-value="{{ .Get "value" }}"
style="
position: relative;
display: inline-flex;
align-items: center;
gap: 8px;
padding: 6px 12px;
font-size: 14px;
font-family: var(--font-family);
color: var(--card-text-color-main);
background-color: var(--card-background);
border: 1px solid var(--card-separator-color);
border-radius: var(--card-border-radius);
cursor: pointer;
transition: all 0.2s cubic-bezier(0.4, 0, 0.2, 1);
user-select: none;
box-shadow: var(--shadow-l1);
"
onmouseover="this.style.backgroundColor='var(--code-background)'; this.style.borderColor='var(--accent-color)';"
onmouseout="this.style.backgroundColor='var(--card-background)'; this.style.borderColor='var(--card-separator-color)';"
onmousedown="this.style.transform='scale(0.96)';"
onmouseup="this.style.transform='scale(1)';"
onclick="(function(btn){
var text = btn.getAttribute('data-value');
if (!text || btn.getAttribute('data-copying')) return;
var saveToClipboard = function(str) {
if (navigator.clipboard && navigator.clipboard.writeText) {
return navigator.clipboard.writeText(str);
} else {
var el = document.createElement('textarea');
el.value = str;
document.body.appendChild(el);
el.select();
document.execCommand('copy');
document.body.removeChild(el);
return Promise.resolve();
}
};
saveToClipboard(text).then(function () {
btn.setAttribute('data-copying', 'true');
var tip = document.createElement('span');
tip.textContent = '已复制!';
tip.style.cssText = 'position:absolute; top:-35px; left:50%; transform:translateX(-50%); background:var(--card-text-color-main); color:var(--body-background); font-size:12px; padding:4px 12px; border-radius:4px; white-space:nowrap; pointer-events:none; opacity:0; transition:all .3s ease; z-index:100; font-weight:bold; box-shadow: var(--shadow-l3); border: 1px solid var(--card-separator-color);';
btn.appendChild(tip);
setTimeout(function(){ tip.style.opacity = '1'; tip.style.top = '-42px'; }, 10);
setTimeout(function () {
tip.style.opacity = '0';
setTimeout(function () { tip.remove(); btn.removeAttribute('data-copying'); }, 300);
}, 1000);
});
})(this);"
>
<svg width="14" height="14" viewBox="0 0 24 24" fill="none" stroke="currentColor" stroke-width="2" stroke-linecap="round" stroke-linejoin="round" style="opacity: 0.8;">
<rect x="9" y="9" width="13" height="13" rx="2" ry="2"></rect>
<path d="M5 15H4a2 2 0 0 1-2-2V4a2 2 0 0 1 2-2h9a2 2 0 0 1 2 2v1"></path>
</svg>
<span style="max-width: 260px; overflow: hidden; text-overflow: ellipsis; white-space: nowrap;">
{{ .Get "label" | default (.Get "value") }}
</span>
</button>
|
这里有几个重要点:
.Get "value":读取调用 Shortcode 时传入的 value 参数.Get "label":展示在按钮上的文字,没传就回退到 value
你也可以根据自己的审美继续微调按钮样式,只要保证核心逻辑不变即可。
3.2. 在文章里调用复制按钮
在任何一篇文章的 index.md 中,你可以这样写:
1
| 在下方的文本框里粘贴 {{< copybtn value="https://api.deepseek.com/v1" >}}
|
效果:
- 按钮显示为:
- 点击按钮:地址被复制到剪贴板,上方短暂出现“已复制!”的深色气泡提示
如果你想让按钮显示的内容和实际复制的内容不一样,例如显示一段更短的说明文字,可以加上 label 参数:
1
| {{< copybtn value="https://api.deepseek.com/v1" label="DeepSeek API 基础地址" >}}
|
这样:
- 复制内容:
https://api.deepseek.com/v1 - 按钮文字:
DeepSeek API 基础地址
4. 在 hugo-theme-stack 中还能封装些什么?
hugo-theme-stack 本身已经有很好的排版和样式,但通过 Shortcodes,我们可以再往上加一层“写作小组件”,比如:
- 高亮提示块:成功/警告/危险提示(例如
{{< hint type="warning" >}}) - 内嵌对比卡片:对比两个工具、两种写法
- 代码运行按钮:一键复制命令、打开外部 Playground 等
通用思路都是:
- 在
layouts/shortcodes/ 里写好 HTML + 少量 JS/CSS - 设计好几个易懂的参数(例如
type、title、value) - 在 Markdown 里用一行
{{< .....>}} 调用
当你发现自己第三次在文章里拷贝同一段 HTML 时,就可以考虑把它抽成一个 Shortcode 了。
5. 总结
- Shortcodes 是 Hugo 自带的官方功能,非常适合在
hugo-theme-stack 这种主题里封装常用的 HTML 组件。 - 把易错、冗长的 HTML + JS 抽成 Shortcode 后,写文章时只需要简单的一行 `{{< …..>}}``,既省时间,又方便后期统一调整样式。
- 你可以从本篇的复制按钮开始,逐步把自己常用的“套路组件”(提示框、按钮组、代码块说明等)都封装成 Shortcodes,让博客真正变成一个为写作服务的系统,而不是反过来被配置绑架。